In this guide, Contains several ways about the table in Word, change the text into a table, change the table to text, Change the layout and direction of the text in the table and there is still much more to be known to the beginner.
By mastering this complete guide will make you more adept at working using a table on Word. Also learn special tricks that you can use to increase speed and make it easier to use tables in Word. You can learn everything in this guide.
Practice in this guide using Word 2010 and Word 2021, so that it can be applied to various versions of Word including Office 365
List of contents:
Creating a Table in Word
In the Word application, You can create tables in various ways. You can create a table by selecting from the Template Gallery Table, using the menu Insert Table or determine the number of rows and desired columns. Here are some ways that can be done to create a table in Word.
Using Table Templates
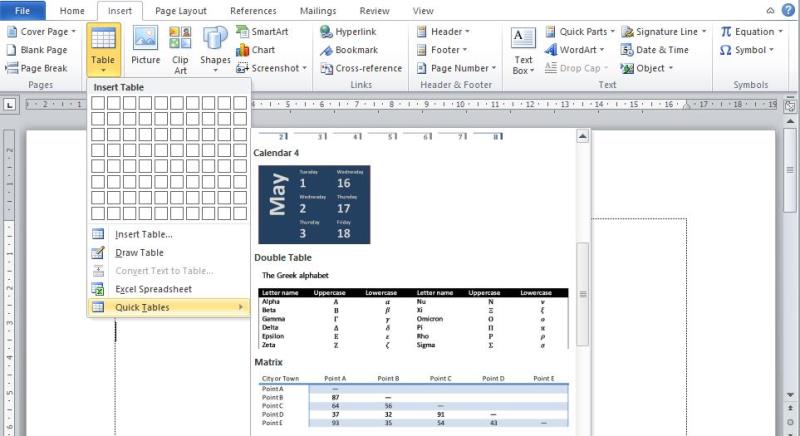
Creating a table using a table gallery that has been previously formatted is very helpful in the ease and speed of designing the table. Table templates contain sample data to help you visualize how the table will look as you add data. By using a table template, You only need to change the data in the table as needed.
To create a table using a table template, do the following steps:
- Click where you want to add the table.
- On the tab Insert, in the group Table, click Table, point the pointer to Quick Tables, Then click the Template Table that suits your needs.
Using the Table Menu
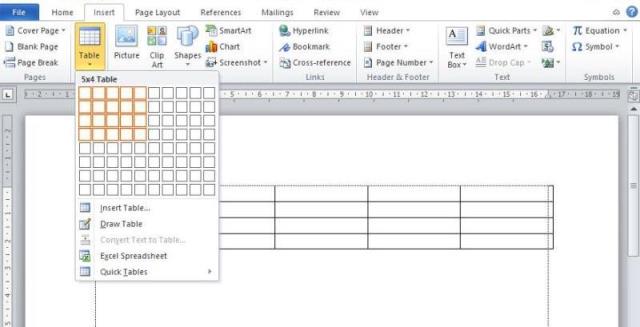
By using the table menu, You can choose the number of columns and the number of rows directly by directing the pointer to the number of columns and the desired row. The following steps to use the table menu:
- Click where you want to place the table.
- On the tab Insert, in the group Table, click Table, Then, under Insert Table, point the pointer to select the number of rows and the desired column.
Using the Insert Table dialog box
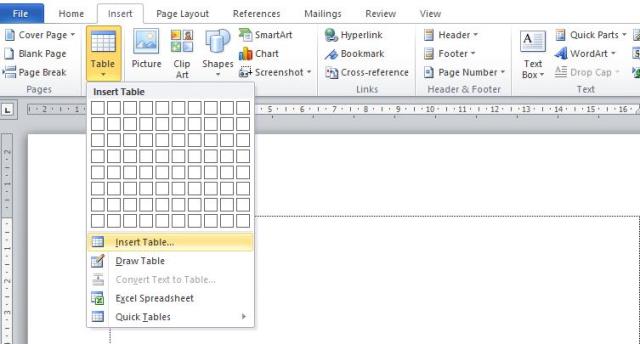
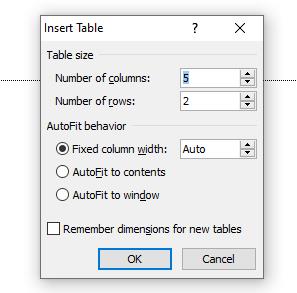
Dialog box Insert Table allows you to select the dimensions and table format before entering the table into the document. By using a dialog box Insert Table, You can determine the number of columns or rows as much as possible, that cannot be done by the menu Table. Here's the steps using the dialog box Insert Table:
- Click where you want to insert the table.
- On the tab Insert, in the group Table, click Table, then click Insert Table.
- On the dialog box Insert Table, in the Table size, Enter the number of columns and rows needed.
- In the AutoFit Behavior, select the option to adjust the table size.
Draw a table
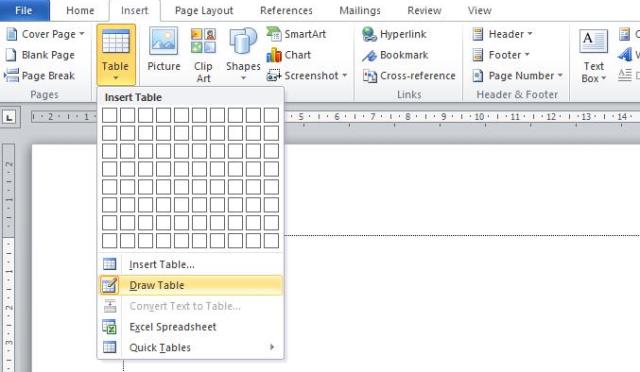
You can draw complex tables using Draw Table, for example a table containing cells with different heights or the number of columns per row that varies. To draw your own table you want to make, do the following steps:
- Click where you want to create the table.
- On the tab Insert, in the group Table, click Table, then click Draw Table. After that the pointer will turn into a pencil.
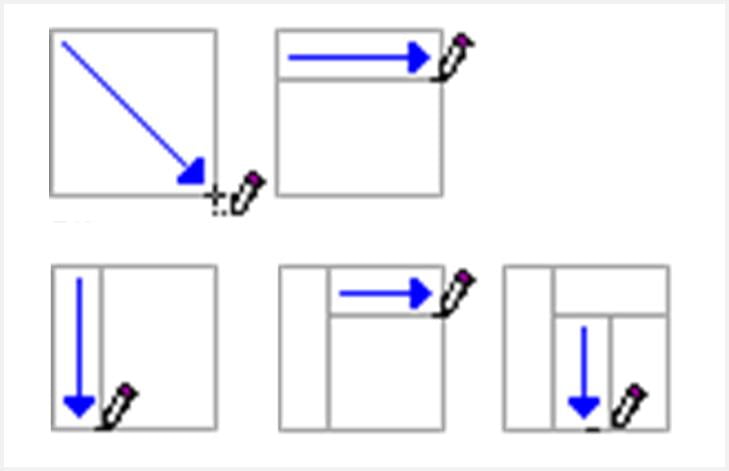
- Furthermore, to create an outer boundary of the table, draw a rectangle. Then draw column lines and row lines inside the rectangle.
Change the text into a table
Besides creating a table using the four ways mentioned above, Creating a table on Word can also be done by changing the text into a table. To convert text to a table in Word, do the following:
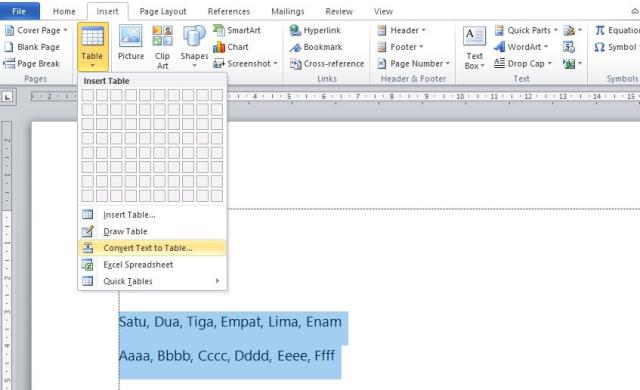
- Prepare the text that will be used as a table, then insert the separator character, like a coma, Dots or tabs to show where you want to divide the text into columns. Use paragraph marks to indicate where you want to start a new line. Examples in this guide using commas as column separator.
- Select the text that you want to change into a table.
- On the tab Insert, in the group Table, click Table then click Convert Text to Table.
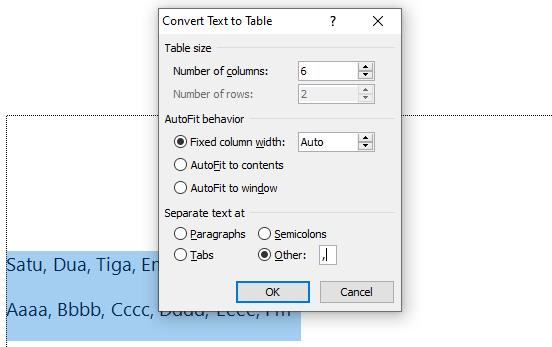
- In the dialog box Convert Text to Table, In Bgian Separate text at, Select the column separator character used in predetermined text. In this guide using a coma as a separation character.
- Click OK to apply. The result will look like the following picture

Change the table in Word
You can change the existing tables in Word, for example removing lines, add columns or rows, delete rows or columns and so on. Here are some guidelines for changing tables in Word.
Changing the table can be done on the tab Table Design or Table Layout, This tab is only active if a table has been selected. In Word, Table tools have a slightly different display according to the word version used.
Delete table lines
You can delete certain lines or blocks in the table, This action will combine several table cells or delete table cells.
To delete the table line, select the table then do the following steps:
- Di tab Design or Table Design, in the Draw Borders, click Eraser. Pointer changes shape to eraser.
- Navigate the eraser to the line you want to delete, Then click the line you want to delete.

Insert a table line
You can insert the row above or below the selected table using the right -click shortcut menu in the following way:
- Right -click on the cell above or below where you want to add a row of the table.
- So, in the shortcut menu, select Insert then click Insert Rows Above or Insert Rows Below.
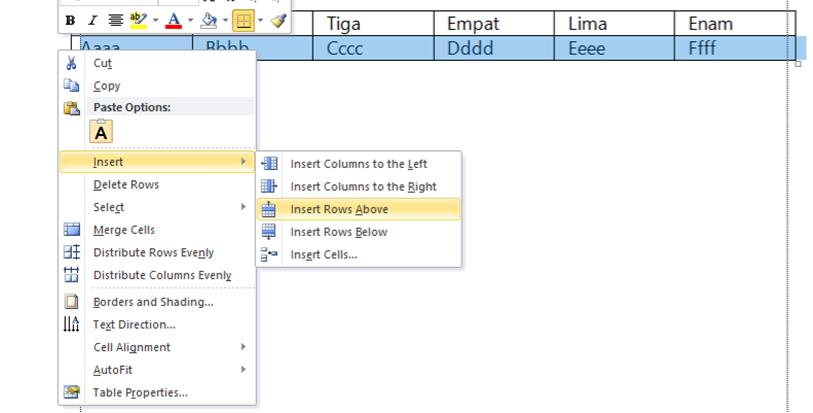
In the latest version of Word, Apart from the above method, also provided buttons Plus When the pointer is directed to the beginning of the table line that functions to insert a table line.
Insert the table column
Just like inserting a table line, You can also insert a column on the left or on the right of the selected table column using the right -click shortcut menu, The way is as follows:
- Right -click on the cell on the left or right where you want to insert a column.
- In the shortcut menu, select Insert, then click Insert Columns to the Left or Insert Columns to the Right.
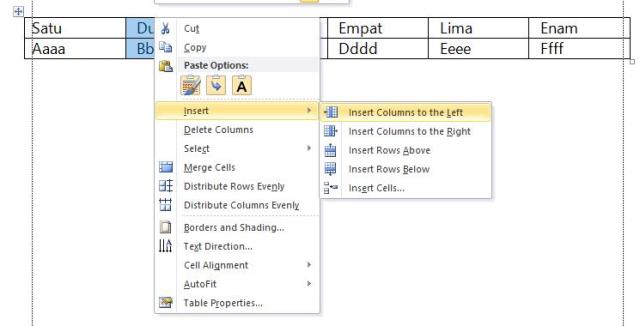
In the latest version of Word, Apart from the above method, also provided buttons Plus When the pointer is directed to the beginning of the table column which functions to insert the table column.
Delete lines of tables
To delete the table line, do the following:
- Select the row you want to delete by clicking on the left of the row or highlight the entire line.
- Then right click on the selected table row, then select Delete Rows.
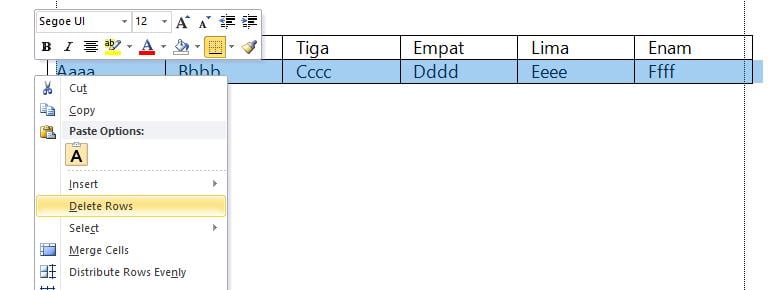
Delete the table column
- Select the columns you want to delete by clicking the grid line or column top border.
- Right click, then click Delete Columns on the shortcut menu.

Combine several table cells
You can combine multiple cells into one larger cell. Suppose you want to create 1 table title that has several columns. The way to combine several cells into one cell is as follows:
- Highlight the cells you want to merge,
- Right click on the highlighted cells, then select Merge Cells
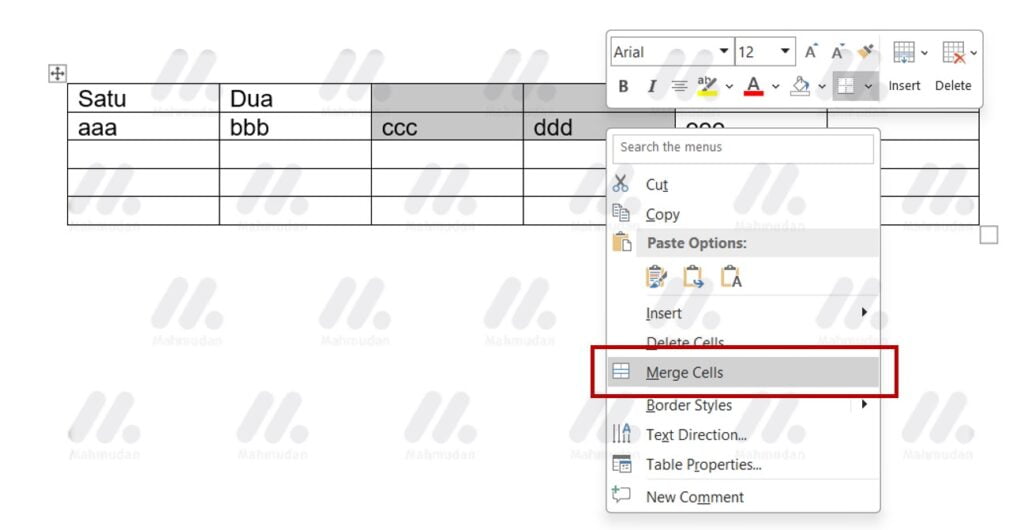
Change the size of the column or row of the table
When you create a table, There are times when the size of the column or row of the table is not in accordance with what is needed, You may need to tidy up the table by changing the width of the column or the height of a particular row in the table. To resize table columns or rows, You can do this in the way below:
Change the size of the column or row using a ruler
Changing the column size of the table can be done by changing the column barrier or row in the ruler. This method is needed when you only want to change the width of a particular column or a certain row height in the table. The way is as follows:
- Click the table, Then point the pointer to the column or row that wants to be changed in size - which is located in the ruler, until the pointer turns shape into two directions arrows.
- In horizontal tries, click and drag left or right to change the column width.
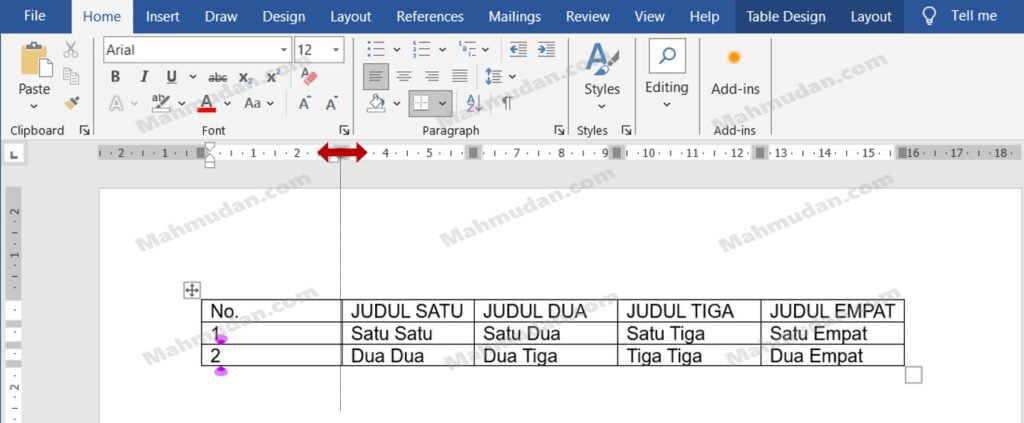
- In a vertical ruler, Click and pull up or bottom to change the height of certain rows in the table.
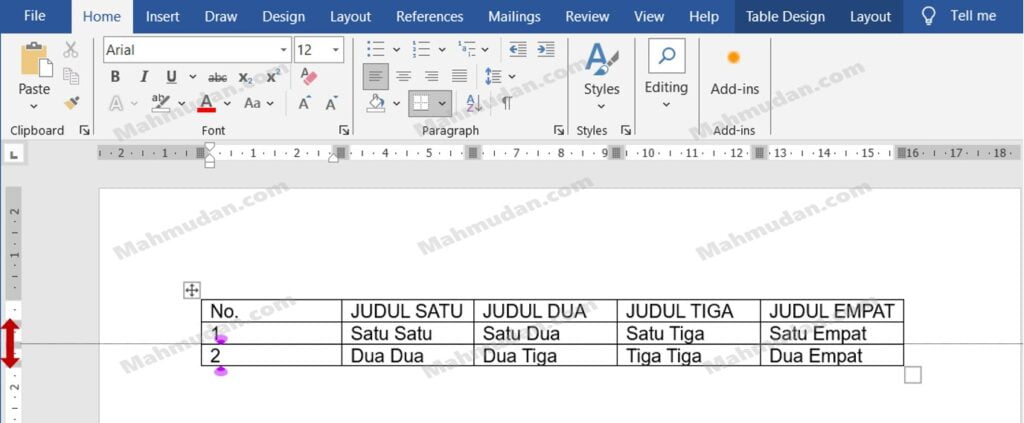
Change the size of the column or row using Table property
Changing the size of the column or row using the property table can be done to change the size of the entire column or the entire row of the table. The way is as follows:
- Right -click the table, then click Table Properties
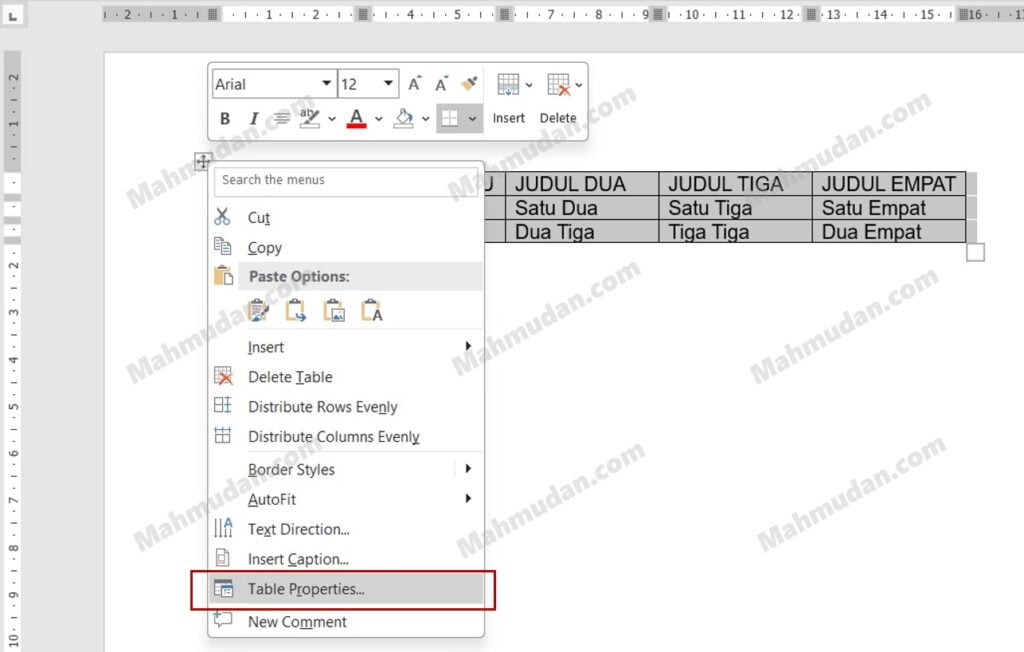
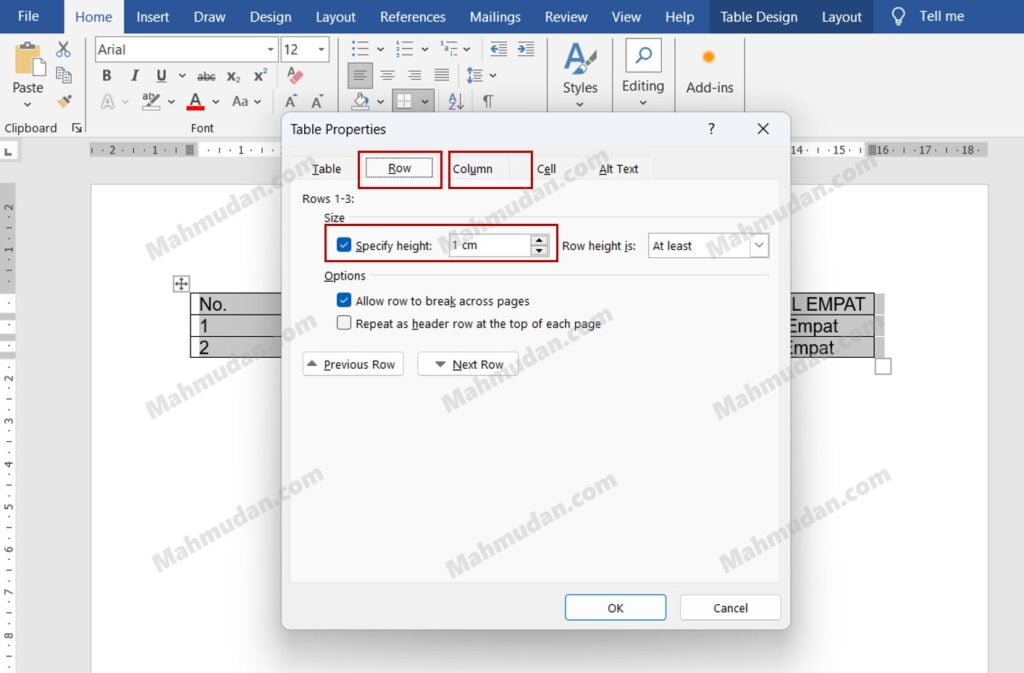
- To change the size of the line, select tabs Row then enable the checkbox Size then fill in the desired size.
- To change the column size, select tabs Column then enable the checkbox Size then fill in the desired size
Designing tables on word
So that your table can be seen clearly and easy to read, You can adjust the layout of the text in the table and add the cell color in the table. Table cell color can be made using an existing table style or applying custom table force.
Changing Text Alignment In Tables
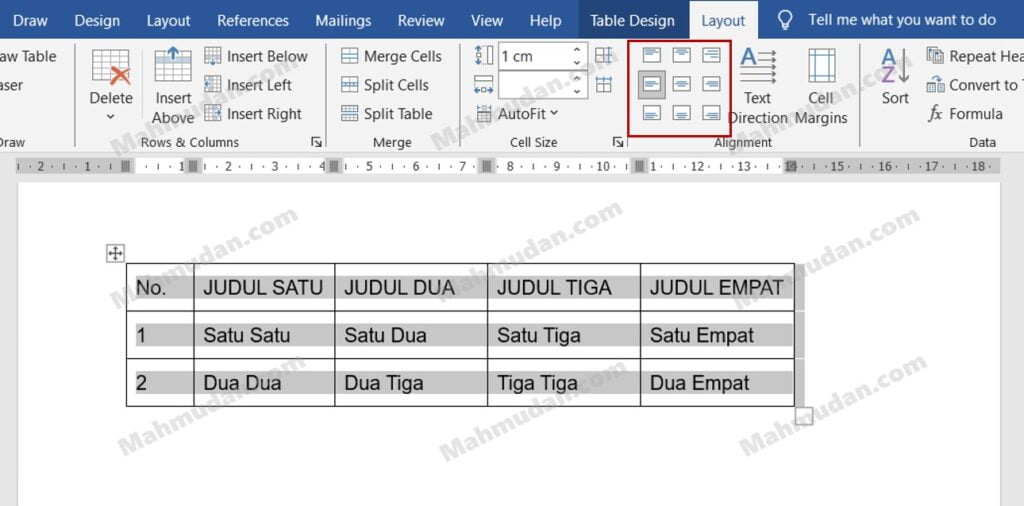
To change the text alignment in a table, do the following steps:
- Click the table or highlight the specific text you want to change the layout for, di tab Layout, in the Alignment select the alignment shape you want to apply.
Change the direction of the text in the table cell
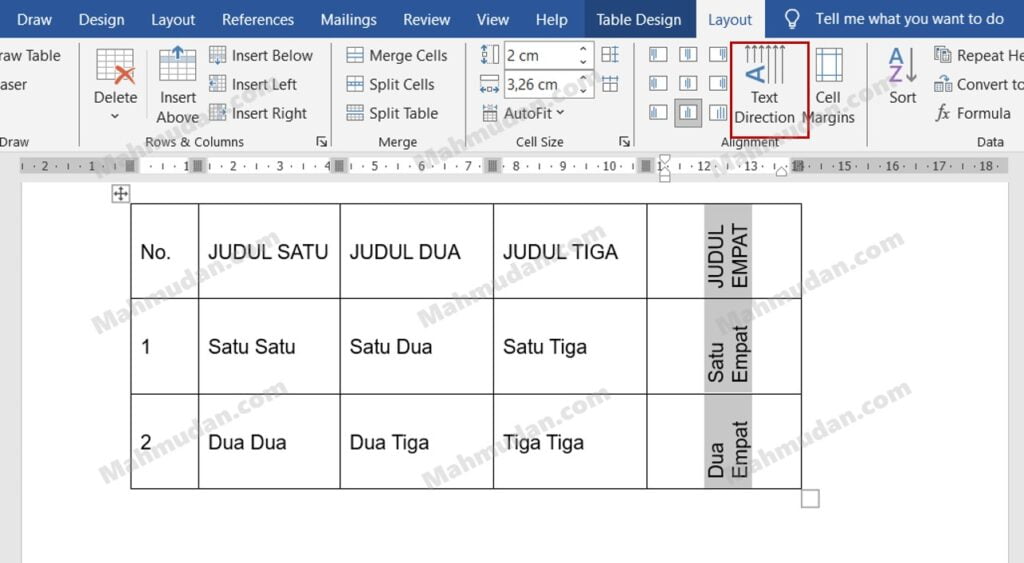
Besides changing the level of text, The text in the table can also be changed in the direction. To change the direction of text in table cells, do the following steps:
- Click the table or highlight the specific text you want to change the direction of, on the tab Layout, in section Alignment, click Text Direction so that the direction of the text changes as desired.
Coloring tables
There are two ways that can be done to color the table in Word. First use the Word -prepared table style, and the second coloring the table manually.
Using a table styles
Word provides various styles of tables that can be applied to your table, to use it is quite easy. The advantage of using a table style is that the color of the table cell color with the text color is set automatically, so the table is easy to read. How to use a table style: Click the table, then in tab Table Design, in the Tables Styles Select the desired table force

Using custom colors
If the color of the table provided Table Styles does not match your needs, You can give your own color color for the table. The method, Table cell highlight, then in tab Table Design, select Shading then select the desired color.

If the cell color of the table you choose does not have a high kotras ratio with text color, You need to manually color the text.
Coloring table text
Coloring the table text is quite easy, Just like coloring text outside the table. The method: highlight the text you want to color, then in tab Home, in the Font Select the option Font Color then select the desired color.

Deleting a Table in Word
You can choose to delete the entire table, or simply delete the contents of the table and maintain the row and column structure. Besides that, If you want to delete a table without losing text in the table, You can change the table into text. The following ways can be done to delete tables in word.
Convert the table into text
In addition to converting text into tables, You can also do the opposite, namely converting the table to text. With this way, You can delete a table without deleting the text. To convert a table to text, do the following:
- Highlight all the tables you want to convert to text
- On the tab Layout, in the Data, click Convert to Text
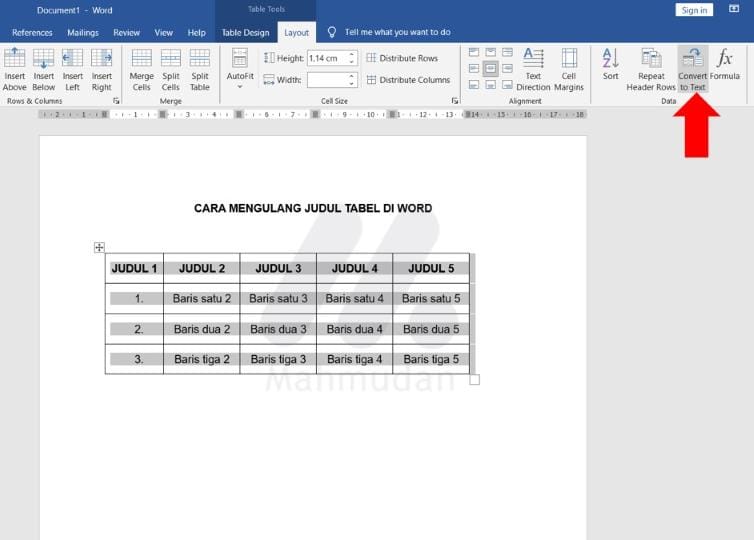
- Then click OK to confirm
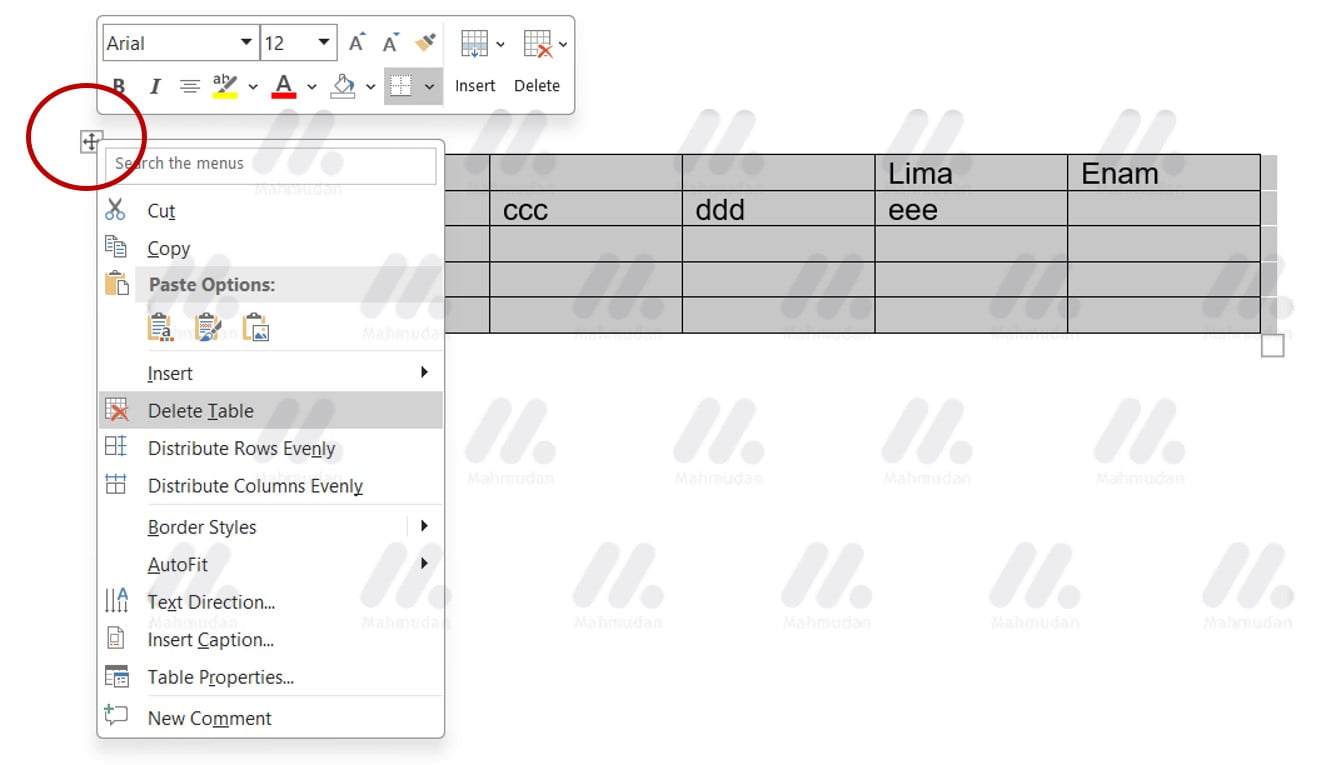
Deleting an Entire Table
To delete the entire table, Place the pointer above the table until the transfer of the table appears, Then right click on the transfer handle then click Delete Table.
Deleting Table Contents
If you want to delete the contents of the table only, Place the pointer above the table until the transfer of the table appears, then press DELETE.
Table Specific Tricks in Word
The following special tricks help you work and design tables in word
Move between cells in the table
Press the button Tab to move the cell atar in the table faster than using a mouse.
Using the Tab or Tab Stop function in the cell
If you want to use a tab or stop tab in the table cell, press Ctrl + Tab to function the tab or tab stop.
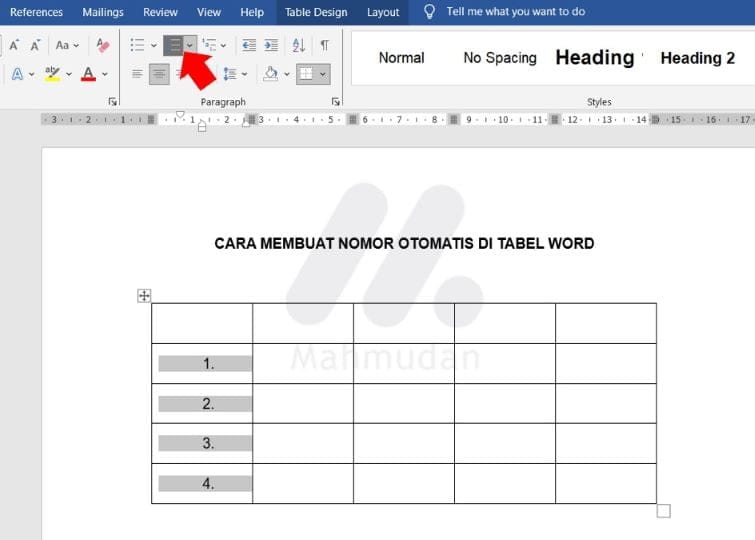
Create an automatic number in the table
Usually, In the leftmost column of a table filled with the data serial number. Rather than making a number manually, You can automatically create a number for the number column in the table, The method is quite easy, highlight some or all cells in column number, then click Numbering.
By using this trick, If you insert or delete lines, The number will automatically be adjusted.
Repeating the table title
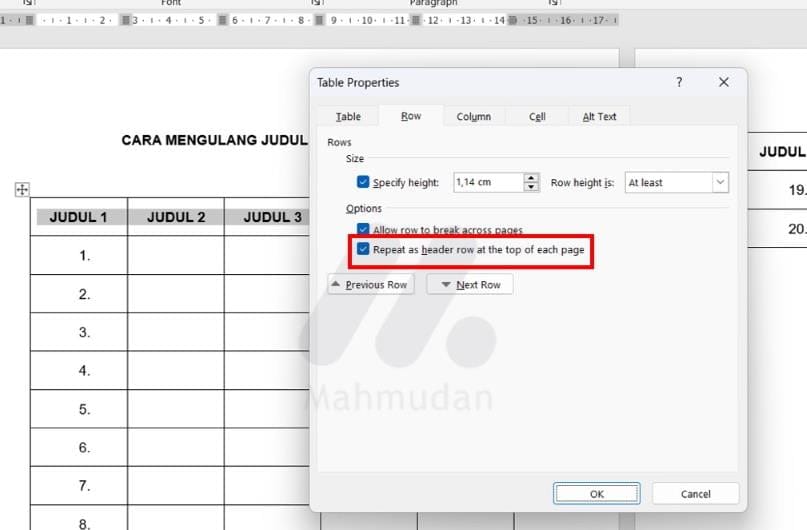
There are times when you make a long table on several document pages, You can repeat a table title in Word so that the table title or header appears on every Word page. Here are the steps:
- Highlight the table title
- Right click on the table title
- Choose Table Properties
- Of Table Properties, di tab Row tick Repeat as header row at the top of each page
Okay, Until here first the table guide in Word. This guide is made specifically for those of you who are new to Word, To be more adept at working using a table in Word. If you like this guide, On another occasion will be updated.
Hope it is useful
